Axiomatic Project
|
Title: The Perfect Pair
Size: Medium: Cardboard Completion: January 2023 |

|

|

|

|

|

|

|

|
Exhibition Text
Shoes are meant to protect you from the ground and you use them when you know that the terrain is rough. Shoes protect and guide you. Taking inspiration from Claes Oldenburg, the enlarged shoes represent my friend and I, creating The Perfect Pair of shoes (and friends) to guide each other through tough terrain. The Adidas shoe represents my friend, clean and organized, while the Doc Martens shoe represents me, disheveled. What I want people to take away from this is that opposites attract.
Inspiration
Artist in Focus: Claes Oldenburg
|
Claes Oldenburg was a Pop artist who would take everyday objects and enlarge them and put them out of their context in the real world. These sculptures would be public installations. It made people think of the function that these objects really have in the world when they're put somewhere you usually wouldn't see them or in the huge size they'd be in. These ideas would be implemented into my own work, but using a different medium, cardboard. My piece would also stick to a much more strict color palette and stick to a couple of materials including glue and cardboard along with the possibility of tape. Oldenburg's sculptures were much larger in size compared to the size I was intending to make my sculpture (no larger than three feet long). His concepts were good to keep in mind for the future when I'd choose an object.

|

|
Artist in Focus: Chris Gilmour
|
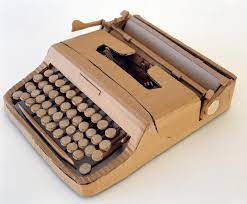
Chris Gilmour uses cardboard as his medium in his sculptures and he also uses the same inspiration of everyday objects in order to create his projects. Some of his projects are small in scale and others are very large. I noticed that he doesn't really scale up his creations and that he stays true to the size of the object's nature. I appreciate how much attention he pays to detail while also letting the cardboard have letters from the brand which he sourced the cardboard from. For example, in his piece called "Fender Stratercaster", the guitar pictured below, you can see the the amount of detail he puts into his sculptures and his way of bending cardboard looks very clean, with no visible cuts. I wanted to have a sleek look to my piece so I took inspiration from that. The little ridges in the cardboard for the frets looked very clean cut as well, helping me choose a cutting vessel of a pocket knife for precise cuts.
|
|

|

|
Planning
|
Once I had the prompt of taking an everyday object and enlarging it but also make it have meaning, I went to make a mind map about things I cared about in my life. The mind map consisted of different ideas and people and things that I could connect to the larger ideas. I ended up thinking of the song "The Perfect Pair" by Beabadoobee and I thought of a pair of shoes. I thought of how shoes protect you from the ground (sometimes a path) and thought of how my closest friends help guide me through this path of life, as of right now. I thought that the shoes could represent me and another person. I immediately thought of my friend Rae and how they know me the best. This could connect back to the title "The Perfect Pair".
|
|
|
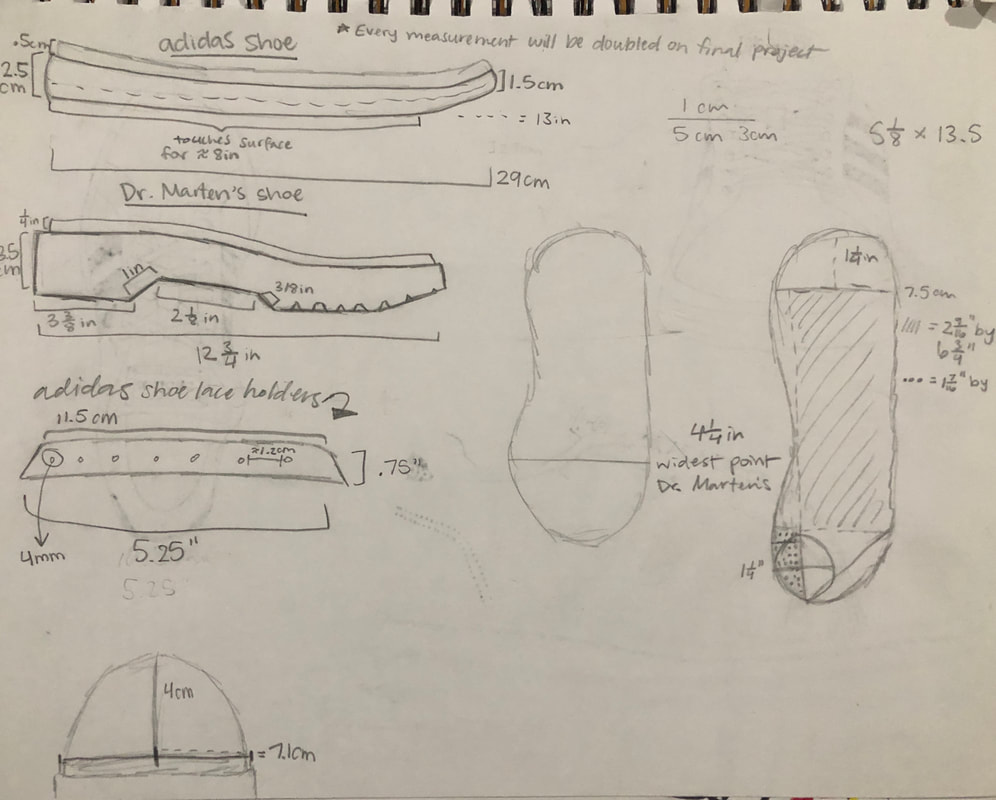
Then I got to drawing the dimensions of the shoes and I made some sketches along with measurements and general ideas that I had for this porject. This was to give me a visual to show Katy, a professor from UW-Milwaukee what I was going to have the completed cardboard shoes look like. I gave multiple angles of the shoes as requested by Katy when she came in to talk about the project.

|

|
Then, Katy from UW-Milwaukee came in to give students feedback. She told me that it was better to start my project sooner than later due to the complexity of my design and choice for this project. From then on, I began to make an accumulation of cardboard, gathering from the boxes that my family had like cereal and packaging boxes, furniture, etc. I also decided that my initial proportions for the project, multiplying the actual shoe size by 3 wasn't a feasible idea because I didn't have any cardboard big enough for that. Then I began to work on getting supplies that would help me make the cardboard fold the way I'd need it to later like an Exact-o knife to make slits in the cardboard. I also used some brown paper that seemed to be made out of the same materials as the cardboard, along with hot glue as my adhesive.
Process
|
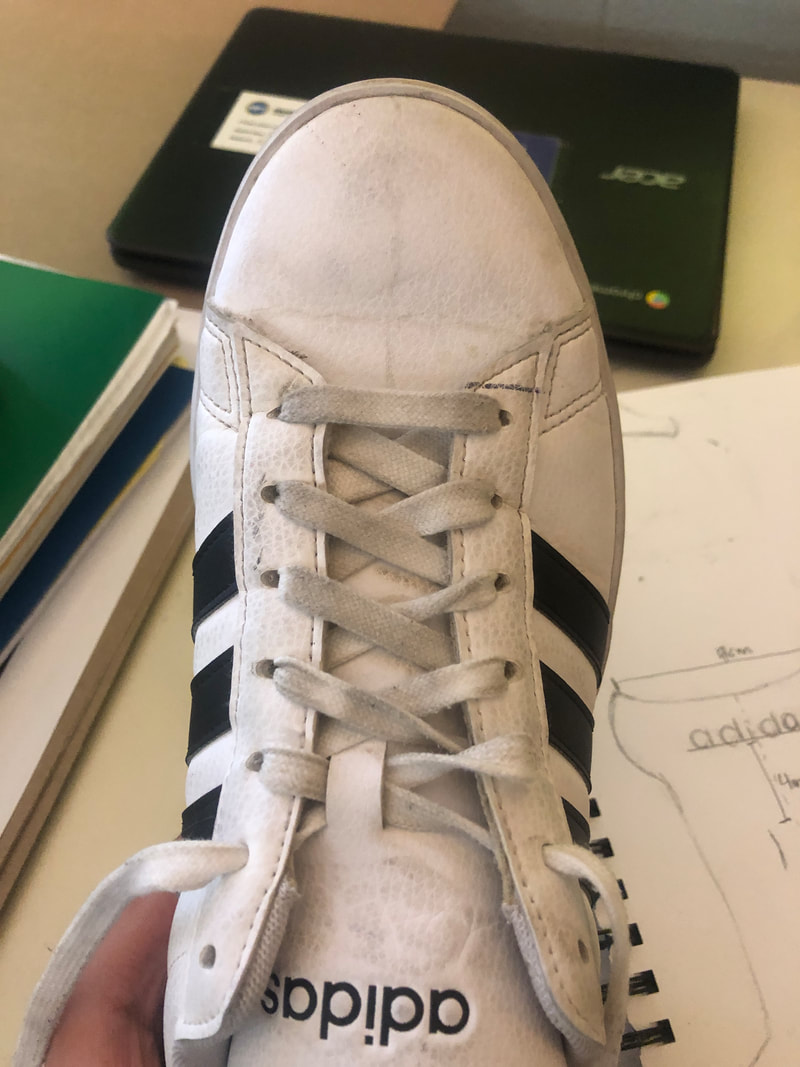
To begin this process I used my biggest piece of cardboard I had which was around 30in by 40in. I knew I wanted to start the Adidas shoe first since I thought that it'd be the more complicated of the two. I took my measurements that I had for the Adidas shoe and I began to trace the outlines for the base or sole of the shoe, remembering to multiply the initial measurements by two.
I realized that I was going to have to do lots of geometry to get this sole done, so I got to it. My process for this was simple in concept but it took so much work to get it done. I had to do some basic geometry to get my measurements, but first I saw what shapes I could make on the sole and I marked them with a Sharpie. I traced circles on the heel of the sole and the toes of the sole. This allowed me to get accurate measurements for curves since I was able to use my x2 scale on my compass that helped me make the circles. Then I transferred my measurements onto my piece of cardboard, double checking my measurements with a ruler and when there were curves, I used a measuring tape. The first time I transferred my measurements, I realized I had placed the back of the shoe incorrectly, I had to make some adjustments. I had already marked it with Sharpie but I used some rubbing alcohol to clean it off. Then I put my measurements in the correct placements this time. 

The tongue and shoelaces were next. The tongue's measurements were taken and then were drawn onto the cardboard. Then I'd use the pocket knife to cut the tongue piece; then I glued it to the inside of the waist of the shoes, making sure that I didn't cover up the eyelets so that I could add shoelaces later. Then, I added some shoelaces to the shoes using the same paper as before, cutting it into thin, long slices of paper. I weaved it through the holes as I referenced the shoe. I added the back pieces of the shoe (the heel). I measured and cut the heel of the shoe and glued it on once everything was done. Finally, I measured the black lines of the Adidas logo and cut them out and glued them onto the waist of the shoes. I was done with the Adidas shoe at this point.
Next was the Doc Marten and since I was going to have it look less put together, the only thing that I really had to make sure I measured accurately was the sole of the shoe so that it'd still look like a general idea of the shoe. I ended up making two cut outs of the sole so that I wouldn't have to worry about covering up the inside of the shoe with paper so that it wouldn't look messy and so it'd stick to a uniform look with the brown of the cardboard. To do this I'd glue the right piece onto the left piece (pictured below).

Next were the quarters. I took measurements of the shoe and multiplied it by two. Then, I traced a shape that resembled the shoe and I cut it out with the pocket knife. I scored it afterwards so that it would bend well. and take the form of the curved angles of the sole. I took my hot glue gun and ran the hot glue against the edge of the sole. I lined up the quarters with the sides and glued it on. I noticed that it needed some support so added some rectangles to help the quarters stay up. I then added the eyelets for the shoelaces using a hole puncher.

|
Below are measurements of the Adidas shoe and the Doc Martens shoe

Below is a diagram of the shoe and its parts.


Then, I began to make the midsoles of the shoe and the place where shoelaces go through, the eyelets. I took my measurements and wrote them down in my notes along with a sketch, pictured above the cardboard layout. After I traced the midsoles and the eyestays, I cut them out and made sure that they fit the sole of the shoes. I also made some holes for the eyelets by using a hole puncher. Then, I glued on some paper that seemed to be made out of the same material as cardboard on the thinner part of the midsole so that it would have a cleaner look in the end. Then, I made the waist of the shoe, the largest part pictured on the left. I took the measurements, doubled them, and traced them onto cardboard. I had to figure out how to make the waists bend and then I remembered something that our teacher taught us, scoring the inside (or the side of the cardboard that wouldn't be visible to the audience) and so I did that on both a horizontal and vertical level. The cardboard was flexible after this. Then, I glued the midsoles onto the sides of the sole and glued the eyelets to the sides of the waist of the shoe with hot glue. For the cut in the cardboard that I accidentally made (below), I hid it by gluing the cut onto the inside of the midsole. It'd look like the original design anyways so I thought that this idea should be carried out.

Below is a diagram of the shoe and its parts.

|


|
Then I began to make the upper part of the shoe. I decided to make it with the cardboard paper since after many trials of trying to make a curve with the actual cardboard didn't work. The upper ended up looking like the Adidas shoe, which means that the curve was too low for the Doc Marten shoe. I scrunched the paper and made it resemble the upper, covering the sides of the shoe where the quarter left empty spaces. This next part of my progress was the most challenging for me. As I was making the tongue and upper part of the shoe, I was finding it difficult to keep the tongue stuck onto the quarters of the shoe with the hot glue (to the right). I noticed I had kept it to the low setting on the hot glue gun and decided to add more power (or heat) to the gun and let it get warmer. While it was getting warmer, I was taking off the glue that was dry from both the tongue and the quarters. I then added the glue that was hotter than before onto the edges of the quarter and glued the tongue on. I found that this actually helped with making the tongue stay on the quarters.
|

|

|
Lastly, I added the shoelaces and the platforms of the shoe. The platforms were relatively easy, as they were just rectangular pieces of cardboard and had to wrap around the shoe. I measured the perimeter of the shoe and doubled the measurements, I cut the rectangles and made it so that they could wrap around most of the shoe for the in part of the platform sole where it pops out from the sole of the shoe that I made prior. Then, I made larger and wider rectangles and I was okay with not having these rectangles wrap all the way around the shoe. I was planning to make this shoe look more disheveled anyways so I made some random sized rectangles and glued them to less wide rectangles. I finally added the shoelaces, made out of the same cardboard paper from before, using long and thin strips of it. They weren't even weaved into the eyelets, instead they were glued on the inside of the quarters. This was the end of my process.
Experimentation
|
In this project, I experimented in the ways that I could manipulate cardboard to make it fluctuate in form and the way that I was utilizing the hot glue.
Scoring the cardboard made it flexible and a versatile material now as it could be bent in ways it wouldn't be able to in its regular form. This made it successful to be used as the feel of the shoe, where the shoe curves the most. This helped me make the smooth edges and curves that the shoes had. This helped a lot with my process as it helped me along my way to create the rest of the parts of the shoes that would be 3 dimensional and have depth as I would use this scoring technique to make the waists and quarters of the shoe flexible was well. Some support rectangles for the Doc Martens were also scored. The way I set up the scoring was by making some equally spaced marks along the edges of the cardboard. This allowed me to get clean and smooth curves that reflected those of Oldenburg and Gilmour but especially Gilmour. His cleanliness with line and overall look of the sculptures he makes was the biggest inspiration for this project. Of course, adding my own take to this sculpture was making one of the shoes look more messy but this was something that I just couldn't risk making look messy since it'd get in the way of taking inspiration from these artists. |


|
|
Another way that I experimented with this project was by the way I was using my hot glue gun. This really showed when I was making the tongue of the Doc Marten. I really struggled with this part because of how I was timing the glue, the temperature of the glue was also a key factor with how the cardboard was working. As you can see, on the right there is a glob of glue that was just sticking on one end of the sculpture and wasn't sticking to the quarter. After many trials of changing the amount of time I was holding the cardboard on the other, I figured that I should have changed the glue temperature from the start. After I changed the temperature to a higher temperature, I found that this was the biggest factor with how the cardboard was reacting.
After dealing with all of this trouble, I now know that it's best to use a higher setting on the hot glue gun if I want my cardboard to stick on, especially when there is a direct curve that's being dealt with, or in this case what the tongue would be sticking onto the quarter. |
|
Critique
|
Spoonbridge and Cherry by Claes Oldenburg
|

The Perfect Pair by Alexandra Medina-Serna
|

Fender Stratercaster by Chris Gilmour
|
Claes Oldenburg
To compare, the ideas and themes of the piece are similar in the way that we both took something small and ordinary that each artist liked, and enlarged it and put it out of context. Our similarities are purely conceptual.
The ways in which we did put our objects out of context contrast though as Oldenburg put his sculptures in public settings to put his object out of context while I put two different shoes as a pair, when pairs of shoes are meant to look the same. The sizes of our sculptures are different as well. Oldenburg's "Dropped Cone" is 11ft tall while my cardboard project was only about 2ft wide. Therefore, our scaling was different. Our materials were also different, as Oldenburg used steel, plastic, and wood, I used cardboard, hot glue, and masking tape. The use of color in Oldenburg's work and my work is also different, as he uses bold colors and shading in this works, while my work is flat in color and there are no painted shadows that are meant to be permanent. Another difference is how I made one sculpture look different from the reference shoe, making it look messy, while Oldenburg has a clean and sleek design.
The ways in which we did put our objects out of context contrast though as Oldenburg put his sculptures in public settings to put his object out of context while I put two different shoes as a pair, when pairs of shoes are meant to look the same. The sizes of our sculptures are different as well. Oldenburg's "Dropped Cone" is 11ft tall while my cardboard project was only about 2ft wide. Therefore, our scaling was different. Our materials were also different, as Oldenburg used steel, plastic, and wood, I used cardboard, hot glue, and masking tape. The use of color in Oldenburg's work and my work is also different, as he uses bold colors and shading in this works, while my work is flat in color and there are no painted shadows that are meant to be permanent. Another difference is how I made one sculpture look different from the reference shoe, making it look messy, while Oldenburg has a clean and sleek design.
Chris Gilmour
To compare, our medium was the same, cardboard. This means that our color palettes were mostly the same, plain brown, at least compared to the sculptures I took inspiration from. His amount of detail was reflected into my own piece as the Adidas shoe was almost exactly to scale and the details on it were reflecting those of Gilmour's work. Also, the sleek look of the Adidas shoe is similar to the guitar of Gilmour because of the visual lack of cuts on our pieces. My piece took direct inspiration of Gilmour's concepts as well; he bases his sculptures on items that one would find on an everyday basis, like a guitar, car, or a typewriter. My item was a shoe and it fits into that category of everyday objects.
To contrast, Gilmour doesn't make his sculptures in pairs, they're usually a singular object. In my piece, I use two figures in the three dimensional form instead of one. Another thing that's different in my piece compared to Gilmour's is the color palette, as his guitar did use some white cardboard. Another difference is the idea of scaling, as Gilmour doesn't seem to scale his sculptures in different sizes. I scaled mine up by 2 while he kept his life sized. As I said before, another contrast is me making a shoe that looks disheveled while his sculptures are very clean and smooth.
To contrast, Gilmour doesn't make his sculptures in pairs, they're usually a singular object. In my piece, I use two figures in the three dimensional form instead of one. Another thing that's different in my piece compared to Gilmour's is the color palette, as his guitar did use some white cardboard. Another difference is the idea of scaling, as Gilmour doesn't seem to scale his sculptures in different sizes. I scaled mine up by 2 while he kept his life sized. As I said before, another contrast is me making a shoe that looks disheveled while his sculptures are very clean and smooth.
Reflection
Coming into this project, I knew it was better to start earlier rather than later but I got started on this about a week before it was due because of my procrastination tendencies. My time management skills were poor during this project but I still had the quality that I intended for this project. It took me a couple hours to get materials and a lot more to get it done but it was a good reminder to keep up with due dates and to work on projects as soon as I can. My approaches to this project, apart from time management, were well thought out and precise. My measurements were as close as I could get them to be to the actual shoes and I'm very proud to be able to use my math skills in this art project. I'm very proud that I was able to get lots done in so little time, I'm most proud of the Adidas shoe, as the creation of that shoe was much more complicated to me than the Doc Martens shoe. This project overall was pretty different for me because I haven't made a sculpture out of cardboard since I was about 10 years old. I like to make my sculptures out of clay and doing this made me realize that using cardboard can be so much more than just basic 2D shapes. I don't usually think of cardboard in any other way but this project forced me to think of form and the manipulation of my material to make it something that isn't usually it's state of being. I liked the ideas that this project left me with.
Connection to ACT
1. Clearly explain how you can identify the cause effect relationship between your inspiration and its effect on your work.
My inspiration of Claes Oldenburg influenced my project because of the idea of taking an everyday object, enlarging it, and putting it in a space that's out of context reflects the work of Oldenburg.
2. What is the overall approach the author has regarding the topic of your inspiration?
The approach that Oldenburg takes on his sculptures is to take something and enlarge it to make people question how these objects would be placed out of their context.
3. What kind of generalizations and conclusions have you discovered about people, ideas, culture, etc. while you researched your inspiration?
I realized that sculptors will take inspiration from anyone and anything, even things that they see everyday.
4. What is the central idea or theme around your inspirational research?
There was an overall theme of taking something and enlarging it which made me think of Pop art sculptor, Oldenburg who I studied last year in Art History. I ended up using this theme but I knew I had to connect this project back to something I cared about, and luckily Oldenburg made his sculptures with the same intentions.
5. What kind of inferences did you make while reading your research?
I thought that Oldenburg only made sculptures due to my studies in Art History last year but I also found that he made paintings and sketches.
MLA Citations
“Claes Oldenburg, Known for His Oversized Pop Art Sculpture, 1929–2022.” ArtReview, artreview.com/claes-oldenburg-known-for-his-oversized-pop-art-sculpture-1929-2022.
Cunningham, Ed. “Claes Oldenburg Art: Where to See His Pop Art Sculptures.” Time Out Worldwide, 20 July 2022, www.timeout.com/art/claes-oldenburg-pop-art-sculptures-where-to-see.
Chris Gilmour. www.chrisgilmour.com.
ShoeTease. “The Ultimate Guide to Shoe Anatomy | 40+ Parts of a Shoe With Names and Images.” ShoeTease Shoe Blog & Styling Advice, 4 Aug. 2022, www.shoe-tease.com/parts-of-a-shoe-anatomy.
What Are the Parts of a Shoe? www.cutcnccam.com/article-show-20111091056566.shtml.
